(Part 2 of this article is now available HERE)
Interested in this ancient food for some time, and looking to pack on a few healthy calories, I thought it was time to give pemmican a try.
Basically, pemmican is pulverized dried raw meat and hard rendered fat. Some people add a small amount of berries, nuts, or spice, but basically it’s raw meat and fat. It’s best known as a calorie-dense Native American food that will last years without refrigeration.
Now, I have to admit, I’ve never eaten pemmican before, but I’m a big fan of jerky and biltong, so how bad could it be, right?
So far, my favourite recipe has to be from the blog “nativepeoplephotographer”. It’s just too simple. The recipe includes only two ingredients: 1 buffalo and 16lbs. of choke cherries! So…maybe a 2000 lbs buffalo might be a bit much to start with, and there aren’t too many of them roaming around in my neighbourhood anyway.
After a bit of research, I found out that the man with a Paleolithic plan is Lex Rooker. Lex has had more than his share of health issues, which has lead him to a more traditional diet. His “$10 Jerky Drier Instructions” and “The Pemmican Manual“ are well known on the Interweb.
After doing my research, I felt reasonably prepared for making a small batch of my own pemmican.
First things first, I headed down to The Healthy Butcher in search of some suitable meat and fat that wouldn’t break the bank. What I ended up with was 2 lbs. of naturally raised (on grass) elk “trim” and a small tub of rendered naturally raised beef fat. Not ideal, as I inferred from Lex that the meat and the fat should be from the same animal to ensure complete nutrition, but I figured I could make it work for a small first-try batch. The meat and the fat were packed up in the back, I got a few other kitchen staples while I was there, and off I went.
What I didn’t realize, and quickly discovered when I got home, was that elk “trim” is generally small, odd shaped chunks of meat…what would normally be turned into ground. So right off the bat, I had a problem. To make pemmican, you need to cut your meat into thin short strips for effective, fast, safe, thorough, low-heat, drying.
A word on food safety: http://www.fsis.usda.gov/factsheets/jerky_and_food_safety/index.asp Read it and take the information as you will, and don’t blame me if you get sick.
The only way to turn what I had into usable meat was to flatten it, so out came the ball-peen hammer and the 4″ thick cutting board. Not the best way to dry your meat, but great for the forearms! I had decided that because this was my first attempt and because I wanted to reduce my chances of getting sick, I would start the drying in the BBQ with a bit of smoke (smoking is a great way to preserve meat). I just wanted the surface of the meat to get lightly smoked to help rid off Salmonella and E.coli…I have no idea if this is reasonable to conclude, but I didn’t think it would hurt and would add a nice subtle authentic flavour.
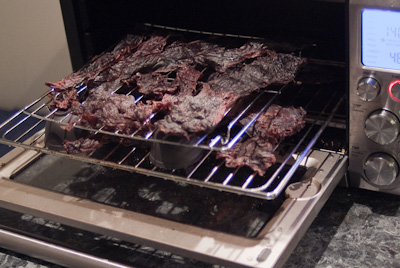
Skip ahead several hours, and I brought the slightly dried and lightly smoked meat into the house where I have a great Breville convection toaster oven that goes down to 120 F. Perfect for drying at 140 F. if it didn’t have a 2 hour maximum time limit on the timer. Oh well, it just means I keep turning it on every 2 hours.
When it was time to go to bed, I put the now 50% dried meat into the refrigerator over night to keep it safe from spoilage. The next morning, back into the oven!
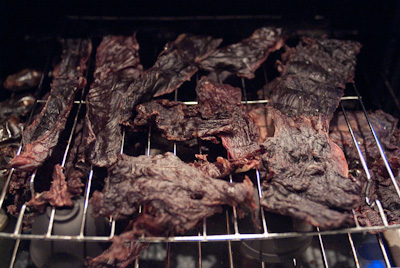
So after a day and a half drying out, this is what 2 lbs of hand-hammered elk looks like!


From the looks of it, I’d say at least another day before it’s completely dry. I’ve also added a few honey-dates to the drying rack to give the pemmican a little extra flavour…we’ll see how that goes.
Thanks for reading, and stay tuned for Part 2!
(Part 2 of this article is now available HERE)
Bon Appetite,
Mr. Carnegie, Scavenger Gourmet

I抳e recently started a blog, the information you offer on this website has helped me greatly. Thanks for all of your time & work.
Can someone recommend Whips, Crops and Canes? Cheers xx